Basic Photo Editing: 3 Techniques to Improve Your Editing Skills
Why Should You Edit Your Photos?
Photo editing is simply the process of improving or adjusting an image after you’ve taken it. But why bother editing at all? Even though modern cameras are impressive, they don’t always capture a scene exactly the way you saw it. Editing allows you to bring the photo closer to how the moment truly felt—or turn it into something more creative and artistic if you prefer.
Editing can be as subtle or as dramatic as you choose. You might brighten a dark image, adjust the colors to match the atmosphere, crop to create a stronger composition, or remove distracting elements. Sometimes tiny changes—like straightening the horizon or fine-tuning the exposure—can completely transform the look and feel of your photo.
Before you start editing, there are two important “pre-edit” steps that set you up for the best results:
1: Shoot Your Photos in RAW Format
While you can edit JPEG files, RAW images contain much more detail and give you far greater flexibility in post-processing. With RAW, you can recover more highlight and shadow information, correct color more accurately, and avoid that “over-edited” look that can happen when pushing a JPEG too far.
2: Adjust Your Lens Profile
Most editing software includes lens profiles designed to correct natural distortions created by your lens. Turning this on automatically reduces things like curvature around the edges of your photo and chromatic aberration (those thin, colored outlines that appear in high-contrast areas). This ensures you’re starting with the cleanest, most accurate version of your image.

What is the First Photo Edit You Should Make?
The very first edit you should make—before touching any sliders—is to level your horizon. A crooked horizon can distract viewers, no matter how beautiful the scene is.
Most editing programs, including Lightroom, offer an “auto level” feature, and it works well most of the time. However, in trickier situations—such as foggy horizons or uneven shorelines—you might want to adjust it manually.
To do this:
Identify your true horizon line.
Use the crop tool to rotate the image slightly up or down until it feels balanced.
This small adjustment can instantly make your photo feel more polished.

Using the “Auto” function to Edit Your Photo
Many editing programs include an “Auto” or “Auto Tone” feature, and while it isn’t perfect, it’s surprisingly useful. With one click, it can give you a strong starting point by adjusting several major elements of your photo:
Balancing Exposure
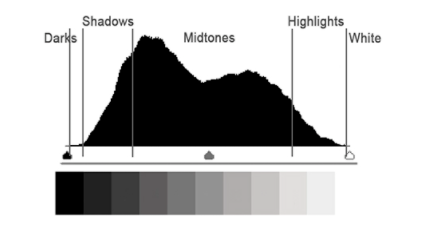
The auto function usually corrects your exposure so the overall brightness feels natural. You can check this by looking at your histogram, a graph that shows the distribution of light in your image. A balanced histogram—without heavy clipping on either end—usually means your image is properly exposed and closer to how the scene looked in real life.
Adjusting Contrast
Contrast refers to the difference between the light and dark areas in your photo. The auto tool will set your contrast to a middle, well-balanced range.
More contrast creates deeper shadows and brighter highlights.
Less contrast softens the image and reduces harsh edges.
You can always adjust this further based on the mood you want.

Fine-Tuning Saturation
Saturation controls the intensity of all colors in your image. Increasing it makes colors look more bold and vibrant, while decreasing it can create a muted, softer look.
Vibrance, on the other hand, boosts only the more muted tones—especially skin tones—while protecting colors that are already bright. This makes vibrance a more subtle and natural-looking adjustment.
The auto feature typically adjusts both saturation and vibrance together to create a pleasing, balanced result. And of course, you can always tweak them to match your creative vision.
Cropping to Adjust Focal Point
Cropping is a simple but powerful way to guide the viewer’s eye. By trimming the edges of the image or applying the rule of thirds—placing your subject along one of the imagined grid lines—you can dramatically strengthen your composition and direct attention exactly where you want it.

Bonus Tip
Turn on your camera’s rule-of-thirds grid and live histogram while shooting. This saves time during editing and helps you better understand exposure and composition while you’re out in the field.
Simple Editing Techniques
These three foundational editing concepts—straightening your horizon, using the auto adjustment tool as a starting point, and cropping with intention—are available in almost every editing program. They not only help you create cleaner, more polished photos, but they also encourage you to think more deliberately while shooting.
Mastering these small steps will improve both your post-processing skills and your “in-camera” decision making—so you can spend less time editing and more time out creating the photos you love.