Camera Settings 101: Understanding Aperture
What is Aperture in Photography?
Aperture refers to the size of the opening inside your camera lens—specifically, the diaphragm that opens and closes to control how much light passes through. If you’ve ever looked into a lens and noticed a little geometric shape that expands and contracts, that’s the diaphragm at work!
Aperture is expressed using numbers such as f/1.4, f/2, f/2.8, f/4, f/5.6, and so on. These measurements are called f-stops, and each one represents a specific amount of light entering the lens. It may feel a bit backwards at first, but here’s the key idea:
The higher the f-stop number, the smaller the opening—and the less light comes in.
The lower the f-stop number, the larger the opening—and the more light comes in.
So although it might seem confusing, you can remember it easily with a simple phrase:
When it comes to f-stops, “less is more.”
In other words, a smaller number means more exposure, and a larger number means less exposure.

How does Aperture Affect Shutter Speed?
Aperture doesn’t work alone—it’s part of the exposure triangle, along with shutter speed and ISO. When you adjust one, another usually needs to shift to maintain proper exposure. Here’s how aperture and shutter speed work together:
Lower f-stop (larger opening) → more light comes in → your shutter doesn’t need to stay open as long, so you get a faster shutter speed.
Higher f-stop (smaller opening) → less light enters → your shutter must stay open longer, resulting in a slower shutter speed.
This relationship becomes especially important in low-light situations, such as indoor events, golden-hour portraits, or nighttime photography. If you need more light and want to avoid a slow shutter—perhaps to prevent motion blur—lowering your f-stop (choosing a larger aperture) can make a big difference.
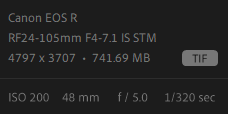
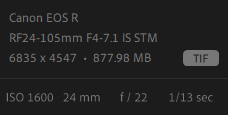
Taking a look at two photos taken with different aperture settings will clearly show how much these choices impact shutter speed, exposure, and overall look.
How does Aperture Affect Depth-of-Field?
Aperture doesn’t just control the brightness of your image—it also influences how much of the scene appears sharp. This is known as depth of field, which describes how much of the area in front of and behind your subject appears in focus.
A low f-stop (wide aperture) gives you shallow depth of field. This creates a beautifully blurred background—often called “bokeh”—which helps your subject stand out sharply against a soft, dreamy backdrop.
A high f-stop (narrow aperture) gives you deep depth of field. More of the scene will appear sharp, from foreground to background—perfect for images where you want lots of detail.
An easy way to remember this:
Low f-stop → large opening → shallow depth of field → blurrier background
High f-stop → small opening → deeper depth of field → sharper background
Understanding this gives you creative control. Whether you want a creamy portrait background or a crisp landscape, your aperture is the key tool.

How to Set Your Aperture?
The “best” aperture depends entirely on what you’re photographing and the artistic effect you want. While photography has no strict rules, here are some friendly guidelines to help you get started:
Portraits: f/1.4 – f/4
This range creates a shallow depth of field, which separates your subject from the background and draws attention directly to them. It’s ideal for headshots, lifestyle photos, or any situation where you want the subject to pop.
Intermediate / Group Photos: f/5.6 – f/9
When photographing small groups or scenes with a bit more environmental detail, a mid-range aperture keeps more of the image sharp without losing that soft, pleasing background.
Landscapes: f/11 and Higher
Landscape photography often depends on capturing rich detail from front to back. Higher f-stops help keep everything sharp, from the closest rock to the farthest mountain. Because smaller apertures let in less light, using a tripod is often recommended.
Building Confidence With Your Aperture Settings
The best way to truly understand aperture is to experiment. Try switching your camera to Aperture Priority mode (A or Av)—this lets you control the aperture while the camera automatically adjusts shutter speed for proper exposure. Choose one scene and capture several shots at different f-stops. You’ll quickly see how dramatically the aperture changes the look and feel of your photos.
With practice, aperture becomes less of a technical setting and more of a creative tool—one that allows you to translate the image in your mind into the image in your camera.